unsafeexternfnrb_say(obj: Value) -> Value {
let name_id =util::rb_intern(str_to_cstring("name").as_ptr());
let ivar_name =class::rb_ivar_get(obj, name_id);
let name =value_to_string(ivar_name);
let message =format!("say, {}", name);
string::rb_utf8_str_new(str_to_cstring(&message).as_ptr(), message.len() as c_long)
}
▶︎ Run bundle exec rake
mkdir -p tmp/x86_64-linux/wasabi/2.7.6
cd tmp/x86_64-linux/wasabi/2.7.6
/opt/hostedtoolcache/Ruby/2.7.6/x64/bin/ruby -I. ../../../../ext/wasabi/extconf.rb
cd -
mkdir -p tmp/x86_64-linux/stage/lib/wasabi
install -c tmp/x86_64-linux/wasabi/2.7.6/wasabi.so lib/wasabi/wasabi.so
cp tmp/x86_64-linux/wasabi/2.7.6/wasabi.so tmp/x86_64-linux/stage/lib/wasabi/wasabi.so
/opt/hostedtoolcache/Ruby/2.7.6/x64/bin/ruby -I/home/runner/work/wasabi/wasabi/vendor/bundle/ruby/2.7.0/gems/rspec-core-3.9.0/lib:/home/runner/work/wasabi/wasabi/vendor/bundle/ruby/2.7.0/gems/rspec-support-3.9.0/lib /home/runner/work/wasabi/wasabi/vendor/bundle/ruby/2.7.0/gems/rspec-core-3.9.0/exe/rspec --pattern spec/\*\*\{,/\*/\*\*\}/\*_spec.rb

Wasabi
  has a version number
  .sum
    1 + 2 = 3
  .call_to_s
    1.to_s
      is expected to eq "1"
    class with :to_s defined
      is expected to eq "foo"

Finished in 0.00192 seconds (files took 0.08639 seconds to load)
4 examples, 0 failures
// 引数の合計数を返す。externfnrb_sum(_mod: Value, a :Value, b: Value) -> Value {
let a =unsafe { fixnum::rb_num2int(a) asi64 };
let b =unsafe { fixnum::rb_num2int(b) asi64 };
let sum = a + b;
unsafe { fixnum::rb_int2inum(sum as SignedValue) }
}
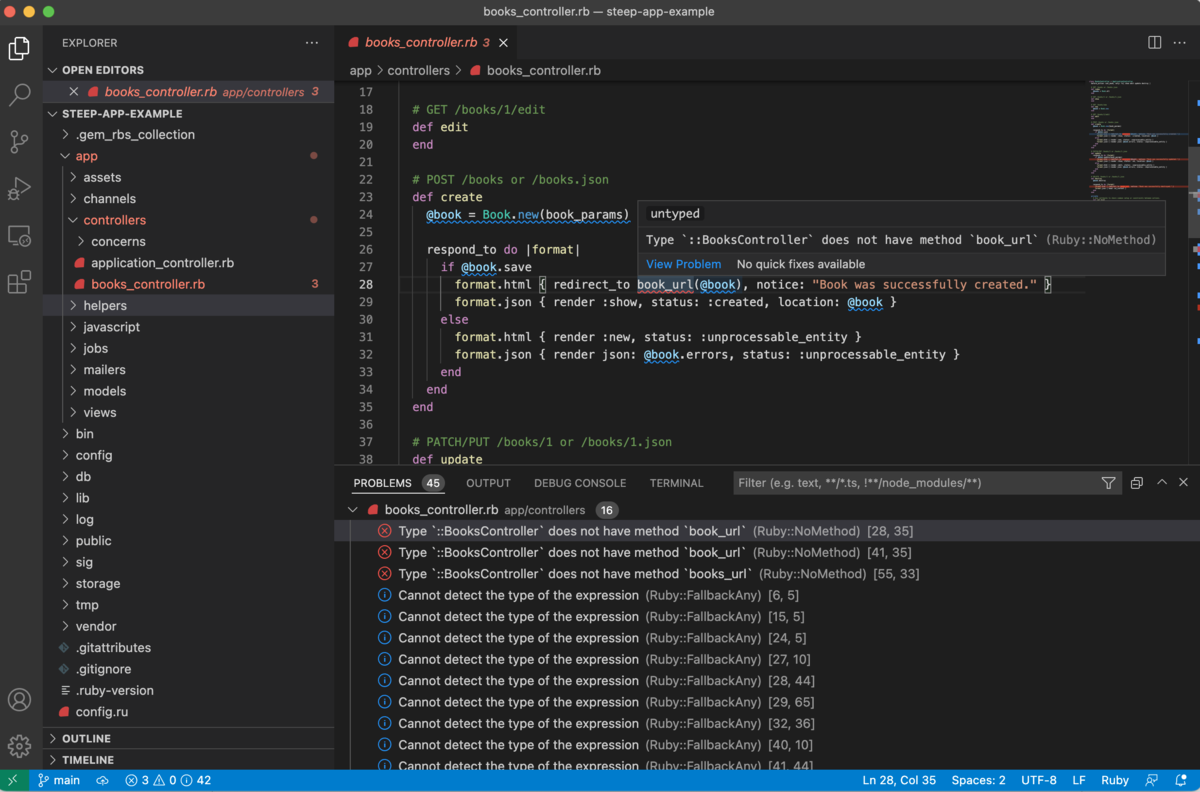
$ bundle exec steep check
# Type checking files:

.....................................................................................................................................................

No type error detected. 🫖
$ ./bundler-summaries
bootsnap: Boot large ruby/rails apps faster
byebug: Ruby fast debugger - base + CLI
capybara: Capybara aims to simplify the process of integration testing Rack applications, such as Rails, Sinatra or Merb
jbuilder: Create JSON structures via a Builder-style DSL
listen: Listen to file modifications
puma: Puma is a simple, fast, threaded, and highly concurrent HTTP 1.1 server for Ruby/Rack applications
rack-mini-profiler: Profiles loading speed for rack applications.
rails: Full-stack web application framework.
sass-rails: Sass adapter for the Rails asset pipeline.
selenium-webdriver: The next generation developer focused tool for automated testing of webapps
spring: Rails application preloader
sqlite3: This module allows Ruby programs to interface with the SQLite3 database engine (http://www.sqlite.org)
turbolinks: Turbolinks makes navigating your web application faster
tzinfo-data:
web-console: A debugging tool for your Ruby on Rails applications.
webdrivers: Easy download and use of browser drivers.
webpacker: Use webpack to manage app-like JavaScript modules in Rails
Removed deploy command and notification support: Today, the functionality provided by deploy command is very limited and doesn't address all the scenarios. We are removing deploy command and notifications support as part of this version. We want to relook at the scenarios and build a more holistic experience that customers need.